24 June 2014

Splash Screen tutorial in Android

You may have seen in most of the applications that a page appears for few seconds then another page is displayed. Usually the page is the name of the company(developer) which is displayed for 5-6 seconds . They are called splash screens .
If you have seen the screens below as you open any of the android applications. You may have a clear idea what we are going to do now .
These screens have mostly appeared before the app starts when you click the iconand then it disappears suddenly. That's what we are gonna make now .

What we need ?
  1. An xml layout that is the screen appearing for 5-6 seconds .(first.xml)
  2. A class that handles the activity of the splash screen .(First.java)
  3. An xml layout that displays the page after splash screen .(second.xml)
  4. A class that handles activity of the second page . (Second.java)
What are we going to do ?
 -> We are going to make an application with 2 pages. The first page will be displayed for 5 seconds and thereafter the second page will be displayed .

Step 1 : First we make the page which is going to be displayed for 5 seconds
imageview android
You may copy-paste the code from below for the above page (first.xml). It is basically an ImageView in between a Relative Layout .

first.xml
<RelativeLayout xmlns:android="http://schemas.android.com/apk/res/android"
    xmlns:tools="http://schemas.android.com/tools"
    android:layout_width="match_parent"
    android:layout_height="match_parent"
    tools:context=".First" >
    <ImageView
        android:id="@+id/imageView1"
        android:layout_width="200dp"
        android:layout_height="200dp"
        android:layout_centerHorizontal="true"
        android:layout_centerVertical="true"
        android:src="@drawable/ic_launcher" />
</RelativeLayout>

Step 2 : Then we have to make an Activity class for the above layout so that it is displayed for only 5 seconds . The name of our file is First.java. Just remember the Life-cycle of Android .
First.java :
package com.mia.splash;

import android.os.Bundle;
import android.app.Activity;
import android.content.Intent;

public class First extends Activity {

    @Override
    protected void onCreate(Bundle savedInstanceState) {
        super.onCreate(savedInstanceState);
        setContentView(R.layout.first);

        Thread timer = new Thread(){
            public void run(){
                try{
                    sleep(5000);
                }catch(InterruptedException e){
                    e.printStackTrace();
            }
        finally{
            Intent openSecond_page = new Intent("com.mia.splash.SECOND");
            startActivity(openSecond_page);
        }
        }
    };
timer.start();
}

    @Override
    protected void onPause() {
        // TODO Auto-generated method stub
        super.onPause();
    
        finish();
    }
    
    } 

Step 3 : We make another layout for displaying the page after the splash screen .We name it second.xml .
welcome page

The code for the layout second.xml is given below :
second.xml
<?xml version="1.0" encoding="utf-8"?>
<RelativeLayout xmlns:android="http://schemas.android.com/apk/res/android"
    android:layout_width="match_parent"
    android:layout_height="match_parent"
    android:orientation="vertical" >
    <TextView
        android:id="@+id/textView1"
        android:layout_width="wrap_content"
        android:layout_height="wrap_content"
        android:gravity="center"
        android:text="This is the main page of our Application"
        android:textAppearance="?android:attr/textAppearanceLarge" />
    <TextView
        android:id="@+id/textView2"
        android:layout_width="wrap_content"
        android:layout_height="wrap_content"
        android:layout_alignParentLeft="true"
        android:layout_centerVertical="true"
        android:gravity="center"
        android:text="Welcome to Made In Android"
        android:textColor="#FF0000"
        android:textSize="40dp" />
</RelativeLayout>

Step 4 : The java file for the second page (Second.java) is as follows :
Second.java
package com.mia.splash;
import android.app.Activity;
import android.os.Bundle;

public class Second extends Activity{  
    protected void onCreate(Bundle savedInstanceState) {
        super.onCreate(savedInstanceState);
        setContentView(R.layout.second);
}
}

Step 5 : Add the classes in AndroidManifest.xml file as shown below .

AndroidManifest.xml
<?xml version="1.0" encoding="utf-8"?>
<manifest xmlns:android="http://schemas.android.com/apk/res/android"
    package="com.mia.splash"
    android:versionCode="1"
    android:versionName="1.0" >
    <uses-sdk
        android:minSdkVersion="8"
        android:targetSdkVersion="16" />
    <application
        android:allowBackup="true"
        android:icon="@drawable/ic_launcher"
        android:label="@string/app_name"
        android:theme="@style/AppTheme" >
        <activity
            android:name="com.mia.splash.First"
            android:label="@string/app_name" >
            <intent-filter>
                <action android:name="android.intent.action.MAIN" />
                <category android:name="android.intent.category.LAUNCHER" />
            </intent-filter>
        </activity>
        <activity
            android:name="com.mia.splash.Second"
            android:label="@string/app_name" >
            <intent-filter>
                <action android:name="com.mia.splash.SECOND" />
                <category android:name="android.intent.category.DEFAULT" />
            </intent-filter>
        </activity>
    </application>
</manifest>

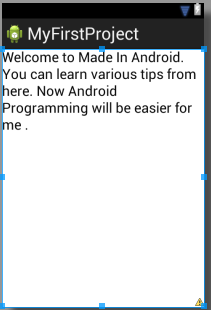
Step 6 : Run the project .
The below page will be displayed for 5 seconds .
splash screenfinal screen

Explanation of the code :
  • In the class First we call the first.xml layout (as we call the class First the layout first.xml will be displayed) .
  • We define a Thread object to control the time for displaying time the page.
  • You may know that run() method is important to implement when we play with Threads .
  • In the run() method we sleep the execution for 5000 milliseconds(i.e. 5 seconds) .It means there will be no execution of program for 5 seconds .
  • We use the try-catch block to avoid ThreadStateException  .
  • Then in the finally block to display the secondactivity(i.e. the next page) .
  • The finally block is called even when exception is occured or not (in any case).
  • The onPause() method is used to pause the execution of the super class (First class).
  • The Second class is executed normally after the First class is executed .
  • In the AndroidManifest.xml the class which has MAIN action is executed first then the class with DEFAULT action is executed .
Stay Tuned with Made In Android

Published By:
Yatin Kode
on 24.6.14

22 June 2014

Custom Dialog Box in Android

Using a Dialog box in an Application reduces the need of xml layout as well as a class. Isn't it a helpful tool. Now lets learn it......

What do you need ?
  1. xml layout for main page (activity_main.xml)
  2. xml layout for dialog box (dialog.xml)
  3. Java class for main page (CustomDialogActivity.java)
  4. A button
  5. An showCustomDialog() method 
What are we going to do ?
We are going to make a button on the main page which when pressed pop ups a dialog box giving a message

Step 1 :  Define an xml file with a button on it. Just remember the id of the button for further use in the java class .
drag button and textview
You can directly copy-paste the code for the above xml file activity_main.xml

activity_main.xml
<RelativeLayout xmlns:android="http://schemas.android.com/apk/res/android"
        android:layout_width="match_parent"
        android:layout_height="match_parent"
        android:padding="10dip">

        <Button
            android:id="@+id/buttondialog"
            android:layout_width="fill_parent"
            android:layout_height="40dip"
            android:layout_alignParentBottom="true"
            android:layout_centerHorizontal="true"
            android:text="Click here"
            android:background="#111122"
            android:textSize="25sp"
            android:textColor="#ffffff"/>

        <TextView
            android:id="@+id/textView1"
            android:layout_width="wrap_content"
            android:layout_height="wrap_content"
            android:layout_centerHorizontal="true"
            android:layout_centerVertical="true"
            android:text="Click the button below to see the dialog box"
            android:textSize="25sp"/>

    </RelativeLayout>

Step 2 : Create another xml file for defining the layout of the dialog box you are going to display.
Right-Click on layout under res and select New -> Android XML File
new android xml file
Give the name of the xml file and click Finish . I have given the name as dialog you can choose any name of your choice.
dialog.xml

Step 3 : Define a RelativeLayout in it along with a TextView and a Back button as shown below .
welcome back
The code for the above layout dialog.xml is given below :

dialog.xml
<RelativeLayout xmlns:android="http://schemas.android.com/apk/res/android"
android:layout_width="match_parent"
android:layout_height="wrap_content"
android:padding="5dip" >
<TextView
        android:id="@+id/TextView1"
        android:textSize="40dp"
        android:layout_width="fill_parent"
        android:layout_height="wrap_content"
        android:layout_alignParentLeft="true"
        android:layout_alignParentTop="true"
        android:gravity="center"
        android:textColor="#FF0000"
        android:text="Welcome to Made In Android" >
    </TextView>

    <Button
        android:id="@+id/button1"
        android:layout_width="120dip"
        android:layout_height="40dip"
        android:layout_below="@+id/TextView1"
        android:layout_centerHorizontal="true"
        android:layout_marginTop="17dp"
        android:text="Back"
        android:background="#00FF00"
        android:textSize="25sp"/>

</RelativeLayout>


Step 5 : Then we define a class for the activity_main.xml .The name of the class will be CustomDialogActivity.java

CustomDialogActivity.java

package com.mia.dialogbox;

import android.app.Activity;
import android.app.Dialog;
import android.os.Bundle;
import android.view.View;
import android.view.View.OnClickListener;
import android.view.Window;
import android.widget.Button;
import android.widget.TextView;

public class CustomDialogActivity extends Activity {

    Button buttonDialog;
    TextView textDialog;
    @Override
    protected void onCreate(Bundle savedInstanceState) {
        super.onCreate(savedInstanceState);
        setContentView(R.layout.activity_main);
        
        textDialog = (TextView)findViewById(R.id.textView1);
        buttonDialog = (Button)findViewById(R.id.buttondialog);
        buttonDialog.setOnClickListener(new OnClickListener() {
            
            @Override
            public void onClick(View v) {
                // TODO Auto-generated method stub
                showCustomDialog(textDialog);
            }
        });
                
    }

    protected void showCustomDialog(final TextView _textDialog) {
        // TODO Auto-generated method stub
        final Dialog dialog = new Dialog(CustomDialogActivity.this);
        dialog.requestWindowFeature(Window.FEATURE_NO_TITLE);
        dialog.setContentView(R.layout.dialog);
        
        final TextView Text1 = (TextView)dialog.findViewById(R.id.textView1);
        Button button = (Button)dialog.findViewById(R.id.button1);    
        button.setOnClickListener(new View.OnClickListener() {
            
            @Override
            public void onClick(View v) {
                // TODO Auto-generated method stub
                dialog.dismiss();
            }
        });
                
        dialog.show();
    }
}

Step 7 : Change the class-name in the AndroidManifest.xml as shown below .

 AndroidManifest.xml
<?xml version="1.0" encoding="utf-8"?>
<manifest xmlns:android="http://schemas.android.com/apk/res/android"
        package="com.mia.dialogbox"
        android:versionCode="1"
        android:versionName="1.0" >

        <uses-sdk
            android:minSdkVersion="8"
            android:targetSdkVersion="16" />

        <application
            android:allowBackup="true"
            android:icon="@drawable/ic_launcher"
            android:label="@string/app_name"
            android:theme="@style/AppTheme" >

            <activity
                android:name="com.mia.dialogbox.CustomDialogActivity"
                android:label="@string/app_name" >
                <intent-filter>
                    <action android:name="android.intent.action.MAIN" />
                   <category android:name="android.intent.category.LAUNCHER" />
                </intent-filter>

            </activity>

        </application>

    </manifest>


Step 6 : Run  the Project
 As you press on the button Click here you will  see a dialog box will appear .
click button

As you press the Back button the dialogbox will be disappeared .
welcome made in android

Explanation of the code :
  • We define an object of Button class and call the onClick() method as\ we have done in one of the previous post .
  • In the onClick() method we call the dialogbox like
showCustomDialog(textDialog);
  • Then we define the metod showCustomDialog and pass the parameters as the textView we are going to display
  • In it we define the onClick() for the Back button which closes the dialog after being clicked
protected void showCustomDialog(final TextView _textDialog) {
        // TODO Auto-generated method stub
        final Dialog dialog = new Dialog(CustomDialogActivity.this);
        dialog.requestWindowFeature(Window.FEATURE_NO_TITLE);
        dialog.setContentView(R.layout.dialog);
        
        final TextView Text1 = (TextView)dialog.findViewById(R.id.textView1);
        Button button = (Button)dialog.findViewById(R.id.button1);    
        button.setOnClickListener(new View.OnClickListener() {
            
            @Override
            public void onClick(View v) {
                // TODO Auto-generated method stub
                dialog.dismiss();
            }
        });
  • After the completion of the showCustomDialog() method we get back again to the previous page activity_main.xml .
You can try to include any element like ImageView, ImageButton etc in the dialog.xml and experiment it.
You can also make spinner in dialog box.


Stay Tuned with Made In Android

Published By:
Yatin Kode
on 22.6.14

20 June 2014

Making a simple List in Android .

Most Applications contain list as a major menu listing layout .

What do you need to make a list ?
  1. A Linear Layout
  2. A ListView
  3. String Array
  4. Array Adapter
  5. Toast
What we are going to do ?
We are going to make a simple list with some car names  and displaythe names of the car selected in a Toast (As I love cars, you can choose your own topic of interest)

Step 1 : Drag a ListView from Composite field in the Palette to the Linear Layout
drag listview

Step 2 : The code you'll find when you click on activity_main.xml will be :

activity_main.xml
<LinearLayout xmlns:android="http://schemas.android.com/apk/res/android"
    android:layout_width="match_parent"
    android:layout_height="match_parent"
    android:orientation="vertical" >
    <ListView
        android:id="@+id/simplelist"
        android:layout_width="match_parent"
        android:layout_height="wrap_content" >
    </ListView>
</LinearLayout>
You might see a <ListView> tag occuring in the code . It has an id attribute. change it since you have to remember it further . The default might be listView1. I have changed it to simplelist  so I can refer it easily later...

Step 3 : The code for the Java file MainActivity.java in src directory is :
MainActivity.java
package com.mia.listproject;

import android.os.Bundle;
import android.app.Activity;
import android.view.View;
import android.widget.AdapterView;
import android.widget.AdapterView.OnItemClickListener;
import android.widget.ArrayAdapter;
import android.widget.ListView;
import android.widget.Toast;

public class MainActivity extends Activity {

    ListView simplelist;
    
    @Override
    protected void onCreate(Bundle savedInstanceState) {
        super.onCreate(savedInstanceState);
        setContentView(R.layout.activity_main);
        
        simplelist = (ListView) findViewById(R.id.list);
        
          String[] values = new String[] { "Audi", "BMW", "Mercedes", "RollsRoyce" };
          
          ArrayAdapter<String> adapter = new ArrayAdapter<String>(this, android.R.layout.simple_list_item_1, android.R.id.text1, values);
          
           simplelist.setAdapter(adapter);
           
           simplelist.setOnItemClickListener(new OnItemClickListener()    

            @Override
            public void onItemClick(AdapterView<?> arg0, View arg1, int position,
                    long id) {                   
                // TODO Auto-generated method stub\
                
                   
                   // ListView Clicked item index
                   int itemPosition     = position;
                   
                   // ListView Clicked item value
                   String  itemValue    = (String) simplelist.getItemAtPosition(position);
                      
                    // Show Alert 
                    Toast.makeText(getApplicationContext(),
                      "Position :"+itemPosition+"  ListItem : " +itemValue , Toast.LENGTH_LONG)
                      .show();
                  }
         }); 
    }
} 

Step 4 : Run the project .
When you click on Audi you will get position : 0 and ListItem : Audi
position and list item

When you click on RollsRoyce you will get Position : 4 and ListItem : 3
position and list item

Explanation of the code :
  • First we have to make an reference of a predefined class ListView so that we can use it further. For that we import ListView class form widget package.
ListView simplelist;
  • We connect the reference simplelist to the ListView in the xml layout by giving the id as the parameter for the function findViewById (Remember the id (bold in the xml code) )
simplelist = (ListView) findViewById(R.id.list);
  • Now we make an array of Strings named values which contains the name of our list-items .
String[] values = new String[] { "Audi", "BMW", "Mercedes", "RollsRoyce" };
  • We define an object of class ArrayAdapter which is a container for String array. It will tell the compiler that the String values are nothing but the elements of the defined list .
ArrayAdapter<String> adapter = new 
ArrayAdapter<String(this, android.R.layout.simple_list_item_1, 
android.R.id.text1, values);
  • It takes parameters such as the type of layout we have used(simple_list_item). Since the values in the list are text so text1 and the String array name which is values .
  • Then we have to set the adapter by passing object of ArrayAdapter as a parameter to setAdapter function .
simplelist.setAdapter(adapter);
  • Then we have to use onItemClick function which defines what should be done when we click the list-item.
simplelist.setOnItemClickListener(new OnItemClickListener()    

            @Override
            public void onItemClick(AdapterView<?> arg0, View arg1, int position,
                    long id) {
  • Then we define an integer which takes the position of list-item from the method parameter named position stores the position of list-item in it.
int itemPosition=position;
  • Then we define a String itemValue which defines the value (i.e. BMW or Mercedes ) from the list-item . Specific itemValue is known when we pass the related position to function getItemAtPosition
String itemValue = (String) simplelist.getItemAtPosition(position);
  • As the Item in list is clicked we will get a Toast showing the position the value at the position.
Stay Tuned with Made In Android 

Published By:
Yatin Kode
on 20.6.14

18 June 2014

Using ImageView in Android

An Android Application without images is like A cake without cream.....
Displaying images in your app is an easy task . All you need to use is an ImageView ...
ImageView - It is a kind of  layout to hold images .
Lets make a simple application with an image .

Step 1 : Choose an image of your choice . You can save the image below if you don't have any .
mia logo
Step 2 : Store your image in your workspace in your project folder(MyFirstProject) in res -> drawable-hdpi
(name of the image must be in small alphabetical letters)
drawable-hdpi

Step 3 : Drag an ImageView from the Palette from Images & Media case .
drag imageview

Step 4 : You will get a dialog box which asks to select an image to be put in the ImageView . Select the desired image and press OK .
ok

Step 5 : You will see the image on your layout like the below screenshot .You can change the height and width of the image by dragging the blue border seen in the image below .
image position

Step 6 : Open the xml file (activity_main.xml) and see the code which will be as follows :
activity_main.xml
<?xml version="1.0" encoding="utf-8"?>
<LinearLayout xmlns:android="http://schemas.android.com/apk/res/android"
    android:layout_width="match_parent"
    android:layout_height="match_parent"
    android:orientation="vertical" >
    <ImageView
        android:id="@+id/imageView1"
        android:layout_width="wrap_content"
        android:layout_height="wrap_content"
        android:src="@drawable/logo" />
</LinearLayout>

If you do not get the image in your layout even if you have your image in the drawable-hdpi folder . Right-click the Project name in the Package Explorer to the left .

Step 7 : Run the Project .
run project

Use of ImageView in CrossAid
ImageView is used to a great extent in CrossAid as shown in the below screenshot .
imageview crossaid
The code for the ImageView from the above screenshot is :
<ImageView
      android:id="@+id/imageView1"
      android:layout_width="wrap_content"
      android:layout_height="wrap_content"
      android:src="@drawable/bite"
      android:layout_gravity="center" />
  • The width and height of ImageView is same as that of the Image .(It wraps the actual height and width of the image - wrap_content) .
  • The Image is in the center so as the layout_gravity says "center" .

Published By:
Yatin Kode
on 18.6.14

15 June 2014

Java Code for Buttons in Android

Here we will learn about linking pages using buttons .

 What do you require ?
  1. A xml file for displaying the button .
  2. Another xml file for navigating to it with the help of the button .
  3. A java file to build logic for the first xml file .
  4. Another java file for creating an instance of the second xml file.
What are we going to do ?
-->   We are going to make a button on a page . Then we are going to display a message on another page when we press the button .

Step 1 : Create to xml files in res -> layout and given them some name of your choice .Right-click on layout .Select New -> Android XML File .

Step 2 : Give a name to the xml file of your choice

Step 3 : Add a button to the xml file like I have shown in the in the previous post .Now you are ready with a button on a page like the screenshot below.
Note : Give a id to the button of your choice so that you can remember it .
The code for the above page is shown below :
firstpage.xml 
<?xml version="1.0" encoding="utf-8"?>
<LinearLayout xmlns:android="http://schemas.android.com/apk/res/android"
    android:layout_width="match_parent"
    android:layout_height="match_parent"
    android:orientation="vertical" >
<Button
       android:id="@+id/button1"
        android:layout_width="wrap_content"
        android:layout_height="wrap_content"
        android:text="Next page" />
</LinearLayout>
The id of the button (green colored) will be required in the java file .

Step 4 : Now make another xml file (secondpage.xml) and display some message on it using TextView .
 The code for the above page is given below :
secondpage.xml
<?xml version="1.0" encoding="utf-8"?>
<LinearLayout xmlns:android="http://schemas.android.com/apk/res/android"
    android:layout_width="match_parent"
    android:layout_height="match_parent"
    android:orientation="vertical" >
<TextView
        android:id="@+id/textView1"
        android:layout_width="match_parent"
        android:layout_height="match_parent"
        android:text="Welcome to Made In Android. You can learn various tips from here. Now Android Programming will be easier for me ."
        android:textAppearance="?android:attr/textAppearanceLarge" />
</LinearLayout>

Step 5 : Now make java files for the above two xml files .Right-click on src. Select New->Class

Step 6 : Give a name of your choice to the classes .
Tip :
  1. Give a name related to the xml file you have created it for to avoid confusion later .
  2. Always start class name with Capital letter (A good practice) .

 Step 7 : You may have got a class body with the specified name in the .java file you just created . Now just extend Activity class to your class .You will get an yellow bulb on the left bar .
Click on the yellow bulb and select Import 'Activity' (android.app) . It says that you must import the package under which the Activity class is situated for using Activity class .

Step 8 : Now add the onCreate() method to the class along with the the link to the xml file of our firstpage.xml file .The name shown in black is the name of xml file .

FirstPage.java
package com.example.myfirstproject;

import com.example.myfirstproject.R;

import android.app.Activity;
import android.os.Bundle;

public class FirstPage extends Activity{
        @Override
    protected void onCreate(Bundle savedinstance) {
        // TODO Auto-generated method stub
        super.onCreate(savedinstance);
        setContentView(R.layout.firstpage);
    }
} 

Step 9 : Now make an instance of  Button . Include Button btn1 in our class outside the onCreate method .
and don't forget to import Button package .
Button btn1;
The button declaration is shown above which is to be typed in the class body outside the onCreate() method.

Step 10 : Connect the instance btn1 with the button in xml file with id button1(from xml file - green colored) . Add the below line in the onCreate() method .
btn1 = (Button)findViewById(R.id.button1);
Step11 : Type the below line of code in the onCreate() method below the line in Step 10 .
btn1.setOnClickListener(new View.OnClickListener() 
You will get a method onClick() directly generated . Make an Intent in the method to perform the navigation action and pass the parameters as the calling class and the called class .
Intent choice=new Intent(FirstPage.this,SecondPage.class);
startActivity(choice);
  • Create an object of Intent class of your choice (choice) .Pass parameters as the class having the button (calling class - FirstPage) and the page going to be occured after the button is pressed (called class - SecondPage) .
  • Call the object by passing it as a parameter to method startActivity().
  • Include a semi-colon after the round brackets .
Step 12 : Add an onCreate() method to the SecondPage class with exending it to Activity class as done earlier. Add setContent method to it and pass parameter as name of the second xml file as shown below .
SecondPage.java
package com.example.myfirstproject;

import android.app.Activity;
import android.os.Bundle;
public class SecondPage extends Activity{
       @Override
    protected void onCreate(Bundle savedinstance) {
        // TODO Auto-generated method stub
        super.onCreate(savedinstance);
        setContentView(R.layout.secondpage);
}
}
Step 13 : Open the AndroidManifest.xml File as shown in the previous post .
The first page of the application is considered as the LAUNCHER CATEGORY
All other pages are default are not needed to be written as DEFAULT .

AndroidManifest.xml
<?xml version="1.0" encoding="utf-8"?>
<manifest xmlns:android="http://schemas.android.com/apk/res/android"
    package="com.example.myfirstproject"
    android:versionCode="1"
    android:versionName="1.0" >

    <uses-sdk
        android:minSdkVersion="8"
        android:targetSdkVersion="16" />

    <application
        android:allowBackup="true"
        android:icon="@drawable/ic_launcher"
        android:label="@string/app_name"
        android:theme="@style/AppTheme" >
        <activity
            android:name="com.example.myfirstproject.FirstPage"
            android:label="@string/app_name" >
            <intent-filter>
                <action android:name="android.intent.action.MAIN" />

                <category android:name="android.intent.category.LAUNCHER" />
            </intent-filter>
        </activity>
        
               <activity
            android:name="com.example.myfirstproject.SecondPage"
            android:label="@string/app_name" >
        </activity>
    </application>

</manifest> 
The FirstPage is the name of the class related to First page and SecondPage is the name of class related to second page

Step 14 : Run the Project .Press the green button at the top .The output will be as shown below .
By clicking on the Next page button you will get the text shown in above screenshot .


Stay Tuned with Made In Android

Published By:
Yatin Kode
on 15.6.14

Previous Page Next Page Home
Top