5 October 2015

Dialog Prompt before closing app

What we will do ?
-> We will use the default hello world application, if the back button is pressed then there will be a dialog box displayed whether to close the application.

What we will need ?
  • Dialog Box
  • Changes in MainActivity.java
Step 1 : Create a new Application. Click on File->New->Android Application Project.
file new android app

Step 2 : Give a name to your application (ExitPrompt) and package name as (com.mia.exitprompt). Click Next continuously.
Click Finish.

Step 3 : Open MainActivity.java from src->com.mia.exitprompt.

MainActivity.java
package com.mia.exitprompt;

import android.app.Activity;
import android.app.AlertDialog;
import android.content.DialogInterface;
import android.os.Bundle;

public class MainActivity extends Activity {

    @Override
    protected void onCreate(Bundle savedInstanceState) {
        super.onCreate(savedInstanceState);
        setContentView(R.layout.activity_main);
    }
  
    public void onBackPressed(){  
  AlertDialog.Builder builder = new AlertDialog.Builder(this);
  builder.setMessage("Are you sure you want to exit ?")
  .setCancelable(false)
  .setPositiveButton("Yes", new DialogInterface.OnClickListener() {
   @Override
   public void onClick(DialogInterface arg0, int arg1) {
    // TODO Auto-generated method stub
    finish();
   }
  });

 .setNegativeButton("No", new DialogInterface.OnClickListener() {
  @Override
  public void onClick(DialogInterface arg0, int arg1) {
   // TODO Auto-generated method stub 
  }
 });
  AlertDialog alert = builder.create();
  alert.show();
  }
}

Step 4 : Run the application. Press the Back button after the application is started.

Explanation of the code :
  • We have prepared an AlertBox. Using the setMessage() method we set the text to be displayed in the alert.
  • setCancelable(false) is used to tell the compiler that the alert box is not exited implicitly.
  • The positive button (yes) is used to exit the application by using finish() method.
  • The negative button (no) is used to be in the same activity by doing nothing inside it.
Github download
Stay Tuned with Made In Android

Published By:
Unknown
on 5.10.15

15 September 2015

First Phonegap app using Applaud plugin in eclipse

So you have downloaded the applaud plugin by following the previous post.

What we will do?
-> We will learn how to run the default phonegap (cordova) app which covers all the functionality of phonegap.

What we will need ?
Step 1 : Click on the applaud plugin installed from the previous post.
applaud plugin

Step 2 : You can use built-in phonegap which is upto v1.41 but if you want a higher version download it from phonegap website and merge it with the plugin. Choose Phonegap API Example. Then click Next.
Inbuit 1.41 API Example

Step 3 : Give a name to your project as MyProject and click Next.
name MyProject

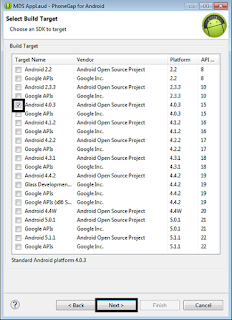
Step 4 : Choose the Target Android version to compile on and click Next. Choose API 15 or above.
api 15 above

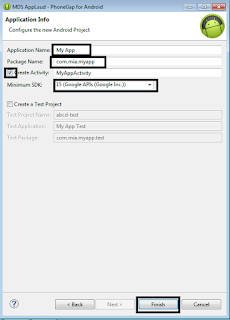
Step 5 : Give a name to your application as My App and package name as com.mia.myapp. Check Create Activity (else you will get NullPointerException) . Choose Minimum SDK as API 15. Click Finish.
my app create activity finish

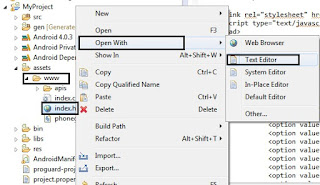
Step 6 : MyProject will be formed in the Project Explorer. Check for index.html in assets->www folder. You can modify it by Right-click on index.html->Open with->Text Editor.
index.html open with text editor

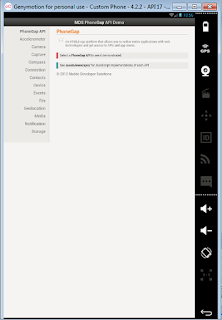
Step 7 : Run app with emulator support above API 15. You can check features of phonegap like Camera, Compass etc.
run app emulator 15 above
Stay Tuned with Made In Android

Published By:
Yatin Kode
on 15.9.15

26 August 2015

Add phonegap (cordova) Applaud plugin for android to eclipse adt

You do not have to write commands to make your phonegap (cordova) application, you can use this plugin to directly create your phonegap application with a single click.

What we will do?
-> We will install Applaud plugin in eclipse so that you can create your phonegap application with just a click.

What we need?
  • Eclipse with ADT
  • Internet connection
  • Emulator of API 12 or above
Step 1 : Start your Eclipse. Go to Help->Install New Software from the menu-bar.
help installnewsoftware

Step 2 : Click on Add. Give Name as MDS Applaud and Location as shown below.
http://svn.codespot.com/a/eclipselabs.org/mobile-web-development-with-phonegap/tags/r1.2.9/download

Then click OK.
Applaud name and location

Step 3 : Tick on MDS Applaud and press Next.
mds next

Step 4 : Click Next
next

Step 5 : Click on "I Agree.." and click Finish.
agree finish

Step 6 : Check the progress in the Progress Bar. Then Restart Eclipse.
install progress
After restarting eclipse you will see the plugin on the toolbar.
applaud plugin

Stay Tuned with Made In Android

Published By:
Yatin Kode
on 26.8.15

12 August 2015

Track SeekBar Progress in Android

What we will do ?
-> We will build a Seekbar in our application. A Toast will be used to get the value of the seekbar.

What we will need ?
  • SeekBar in activity_main.xml
  • MainActivity.java
Step 1 : Create a new application. Go to File->New->Android Application Project.
File New Android Project

Step 2 : Give a name to your application (SeekBarDemo) and package name (com.mia.seekbardemo).Click Next continuously.
seekbardemo mia
Click Finish.
finish

Step 3 : Drag SeekBar from Palette->Form Widgets in activity_main layout.
drag seekbar from palette
activity_main.xml
<RelativeLayout xmlns:android="http://schemas.android.com/apk/res/android"
    xmlns:tools="http://schemas.android.com/tools"
    android:layout_width="match_parent"
    android:layout_height="match_parent"
    android:paddingBottom="@dimen/activity_vertical_margin"
    android:paddingLeft="@dimen/activity_horizontal_margin"
    android:paddingRight="@dimen/activity_horizontal_margin"
    android:paddingTop="@dimen/activity_vertical_margin"
    tools:context="com.mia.seekbardemo.MainActivity" >


    <SeekBar
        android:id="@+id/seekBar1"
        android:layout_width="match_parent"
        android:layout_height="wrap_content"
        android:layout_alignParentTop="true"
        android:layout_centerHorizontal="true"
        android:layout_marginTop="48dp"
        />
</RelativeLayout>

Step 4 : Open MainActivity.java from src->com.mia.seeekbardemo in Project Explorer and copy-paste the code shown below.

MainActivity.java
package com.mia.seekbardemo;

import android.app.Activity;
import android.os.Bundle;
import android.widget.SeekBar;
import android.widget.SeekBar.OnSeekBarChangeListener;
import android.widget.Toast;

public class MainActivity extends Activity {
 
    @Override
    protected void onCreate(Bundle savedInstanceState) {
        super.onCreate(savedInstanceState);
        setContentView(R.layout.activity_main);
        
        final SeekBar seek = (SeekBar) findViewById(R.id.seekBar1);
        
        seek.setOnSeekBarChangeListener(new OnSeekBarChangeListener() {
         
         int change = 0;
   @Override
   public void onProgressChanged(SeekBar seekBar, int progress,
     boolean fromUser) {
    change=progress;  
   }

   @Override
   public void onStartTrackingTouch(SeekBar seekBar) {
    // TODO Auto-generated method stub 
   }

   @Override
   public void onStopTrackingTouch(SeekBar seekBar) {
    // TODO Auto-generated method stub
    Toast.makeText(MainActivity.this, Integer.toString(change), Toast.LENGTH_SHORT).show();
   }    
        });        
        }
    }

Step 5 : Run the application.
seekbar output

Explanation of the code :

Explanation from MainActivity.java :
  • We make a variable of class SeekBar named seek using findViewById() method which connects it to the widget in activity_main.xml with id as seekBar1.
final SeekBar seek = (SeekBar) findViewById(R.id.seekBar1);
seek.setOnSeekBarChangeListener(new OnSeekBarChangeListener() {      
         int change = 0;
  • Inside onProgressChanged() we give the value of progress variable defined by default in the method parameters to our variable change.
public void onProgressChanged(SeekBar seekBar, int progress,
     boolean fromUser) {
    change=progress;  
   }
  • Inside method onStopTrackingTouch() we define what should be done after touch action is carried out. We display a Toast with the value of change or progress which varies from 0 to 100 by default.
public void onStopTrackingTouch(SeekBar seekBar) {
    // TODO Auto-generated method stub
    Toast.makeText(MainActivity.this, Integer.toString(change), Toast.LENGTH_SHORT).show();
   }   
Github download
Stay Tuned with Made In Android

Published By:
Yatin Kode
on 12.8.15

4 August 2015

Custom ListView with Image and SubItem

We will learn to navigate to a new page by clicking on list item. I will consider a Custom List from the one of the previous post.

What we will do?
-> We will make a list with some items. When we click on a list-item we will traverse to a specific page.

What we will need?
  • activity_jaguar.xml (newly added)
  • MainActivity.java (changes required)
  • Jaguar.java (newly added)
  • AndroidManifest.xml (changes required)
Note : we will edit the project from one of the previous post of Custom List.

Step 1 : Add a android xml file in res->layout folder and name it as activity_jaguar.xml. Right Click on layout->New->Android XML Layout.

activity_jaguar.xml
<?xml version="1.0" encoding="utf-8"?>
<LinearLayout xmlns:android="http://schemas.android.com/apk/res/android"
    android:layout_width="match_parent"
    android:layout_height="match_parent"
    android:orientation="vertical" >

    <TextView
        android:id="@+id/textView1"
        android:layout_width="wrap_content"
        android:layout_height="wrap_content"
        android:text="Jaguar's business was founded as the Swallow Sidecar Company in 1922, originally making motorcycle sidecars before developing bodies for passenger cars." />

</LinearLayout>

Step 2 : Add a class under src->com.mia.customlistdemo folder by  name it as Jaguar.java. Right Click on com.mia.customlistdemo under src->New->Class

Jaguar.java
package com.mia.customlistdemo;

import android.app.Activity;
import android.os.Bundle;

public class Jaguar extends Activity{
public void onCreate(Bundle savedInstanceState) {
 super.onCreate(savedInstanceState);
 setContentView(R.layout.activity_jaguar);
 }
}
The Project Skeleton is shown as below:

Step 3 : Go to MainActivity.java from the previous post. Remove the toast at the end lines and replace it with Intents. Right now I will connect only the second list item(Jaguar) with one page (Jaguar.java), the other list items will return a toast as before.
The modified MainActivity.java is shown below
package com.mia.customlistdemo;

import java.util.ArrayList;
import java.util.HashMap;
import android.app.ListActivity;
import android.content.Context;
import android.content.Intent;
import android.os.Bundle;
import android.text.Editable;
import android.text.TextWatcher;
import android.view.LayoutInflater;
import android.view.View;
import android.view.ViewGroup;
import android.widget.ArrayAdapter;
import android.widget.EditText;
import android.widget.ImageView;
import android.widget.ListView;
import android.widget.TextView;
import android.widget.Toast;

public class MainActivity extends ListActivity {
  
   //ArrayList thats going to hold the search results
          ArrayList<HashMap<String, Object>> searchResults;

   //ArrayList that will hold the original Data
          ArrayList<HashMap<String, Object>> originalValues;
   LayoutInflater inflater;
 @Override
   public void onCreate(Bundle savedInstanceState) {
  super.onCreate(savedInstanceState);
   
  setContentView(R.layout.activity_main);
  final EditText searchBox=(EditText) findViewById(R.id.searchBox);
  ListView playersListView=(ListView) findViewById(android.R.id.list);
  
  //get the LayoutInflater for inflating the customomView
  //this will be used in the custom adapter
  inflater=(LayoutInflater) getSystemService(Context.LAYOUT_INFLATER_SERVICE);
  
  //these arrays are just the data that 
  //I'll be using to populate the ArrayList
  //You can use our own methods to get the data
  String names[]={"FIESTA","XJ","BOXSTER"}; 
  
  String teams[]={"Ford","Jaguar","Porsche"};
  Integer[] photos={R.drawable.picford,R.drawable.picjaguar,R.drawable.picporsche};
         originalValues=new ArrayList<HashMap<String,Object>>();
         
         //temporary HashMap for populating the 
  //Items in the ListView
  HashMap<String , Object> temp;
  
  //total number of rows in the ListView
  int noOfPlayers=names.length;
  
  //now populate the ArrayList players
  for(int i=0;i<noOfPlayers;i++)
  {
   temp=new HashMap<String, Object>();
  
   temp.put("name", names[i]);
   temp.put("team", teams[i]);    
   temp.put("photo", photos[i]);
  
   //add the row to the ArrayList
   originalValues.add(temp);        
  }
  //searchResults=OriginalValues initially
  searchResults=new ArrayList<HashMap<String,Object>>(originalValues);
  
  //create the adapter
  //first param-the context
  //second param-the id of the layout file 
  //you will be using to fill a row
  //third param-the set of values that
  //will populate the ListView
  final CustomAdapter adapter=new CustomAdapter(this, R.layout.activity_item,searchResults); 
  
  //finally,set the adapter to the default ListView
  playersListView.setAdapter(adapter);
  searchBox.addTextChangedListener(new TextWatcher() {
  
  public void onTextChanged(CharSequence s, int start, int before, int count) {
    //get the text in the EditText
    String searchString=searchBox.getText().toString();
    int textLength=searchString.length();
    searchResults.clear();
  
           for(int i=0;i<originalValues.size();i++)
    {
   String playerName=originalValues.get(i).get("name").toString();
          if(textLength<=playerName.length()){
   //compare the String in EditText with Names in the ArrayList
     if(searchString.equalsIgnoreCase(playerName.substring(0,textLength)))
     searchResults.add(originalValues.get(i));
   }}
    adapter.notifyDataSetChanged();
  }
  
  public void beforeTextChanged(CharSequence s, int start, int count,
      int after) {}
    
  public void afterTextChanged(Editable s) {}
   });
  }
  
  //define your custom adapter
  private class CustomAdapter extends ArrayAdapter<HashMap<String, Object>>
  {
   public CustomAdapter(Context context, int textViewResourceId,
     ArrayList<HashMap<String, Object>> Strings) {
  
    //let android do the initializing :)
    super(context, textViewResourceId, Strings);
   }
  
   //class for caching the views in a row  
   private class ViewHolder
   {
    ImageView photo;
    TextView name,team;
   }
  
   ViewHolder viewHolder;
  
   @Override
   public View getView(int position, View convertView, ViewGroup parent) {
  
    if(convertView==null)
    {
     convertView=inflater.inflate(R.layout.activity_item, null);
     viewHolder=new ViewHolder();
  
      //cache the views
      viewHolder.photo=(ImageView) convertView.findViewById(R.id.photo);
      viewHolder.name=(TextView) convertView.findViewById(R.id.name);
      viewHolder.team=(TextView) convertView.findViewById(R.id.team);
  
       //link the cached views to the convertview
       convertView.setTag(viewHolder);
    }
    else
     viewHolder=(ViewHolder) convertView.getTag();
    int photoId=(Integer) searchResults.get(position).get("photo");
  
    //set the data to be displayed
    viewHolder.photo.setImageDrawable(getResources().getDrawable(photoId));
    viewHolder.name.setText(searchResults.get(position).get("name").toString());
    viewHolder.team.setText(searchResults.get(position).get("team").toString());
    //return the view to be displayed
    return convertView;
   }
  }
  protected void onListItemClick(ListView l, View v, int position, long id) {
   // TODO Auto-generated method stub
   super.onListItemClick(l, v, position, id);
   String str = searchResults.get(position).get("name").toString();
   try{
    if(str=="XJ"){
     Class jClass = Class.forName("com.mia.customlistdemo.Jaguar");
     Intent jIntent = new Intent(this, jClass);
     startActivity(jIntent);
     }
    if(str=="FIESTA"){
     Toast.makeText(getApplicationContext(), "FIESTA\nFORD", Toast.LENGTH_SHORT).show();
    }
    if(str=="BOXSTER"){
     Toast.makeText(getApplicationContext(), "BOXSTER\nPORSCHE", Toast.LENGTH_SHORT).show();
    }
   }
    catch(Exception e){
     e.printStackTrace();
    }
   
}
}
MainActivity.java


Step 4 : Open AndroidManifest.xml and add activity of Jaguar class as shown below.

Android Manifest.xml
<?xml version="1.0" encoding="utf-8"?>
<manifest xmlns:android="http://schemas.android.com/apk/res/android"
    package="com.mia.customlistdemo"
    android:versionCode="1"
    android:versionName="1.0" >

    <uses-sdk
        android:minSdkVersion="8"
        android:targetSdkVersion="21" />

    <application
        android:allowBackup="true"
        android:icon="@drawable/ic_launcher"
        android:label="@string/app_name"
        android:theme="@style/AppTheme" >
        <activity
            android:name=".MainActivity"
            android:label="@string/app_name" >
            <intent-filter>
                <action android:name="android.intent.action.MAIN" />

                <category android:name="android.intent.category.LAUNCHER" />
            </intent-filter>
        </activity>
        
        <activity
            android:name=".Jaguar"
            android:label="@string/app_name" >
        </activity>
    </application>

</manifest>

Step 5 : Run the Project.

Explanation of the code :

Explanation from MainActivity.java :
  • At line 162 we have made a variable jClass of type Class and stored location of Jaguar Class there.
  • Then we made use of Intent to reference this(MainActivity) class with Jaguar class.
Explanation from AndroidManifest.xml :
  • We have just added a new Activity of Jaguar class.

Stay Tuned with Made In Android

Published By:
Yatin Kode
on 4.8.15

Previous Page Next Page Home
Top