20 June 2015

Make Custom Listview with search box

What we will do ?
-> We will prepare a custom list with icon and sub-item included with original item in a list.

Step 1 : Create a New Application. Click on File->New->Android Application Project.
File New Android Application Project.

Step 2 : Give a name to your application as CustomListdemo and package name as com.mia.customlistdemo.
Click Next continuously and then click Finish.
MainActivity activity_main

Step 3 : Drag a ListView in the activity_main.xml from Palette->Composite.
drag listview from pallete
activity_main.xml
<?xml version="1.0" encoding="utf-8"?>
<LinearLayout xmlns:android="http://schemas.android.com/apk/res/android"
    android:orientation="vertical"
    android:layout_width="fill_parent"
    android:layout_height="fill_parent">
    <EditText
    android:id="@+id/searchBox"
    android:layout_width="fill_parent"
    android:layout_height="wrap_content"
    android:hint="SEARCH CAR"
    android:layout_margin="5dp"
      android:padding="10dp" />
<ListView
        android:id="@android:id/list"
        android:layout_width="fill_parent"
        android:layout_height="0dp"
        android:layout_weight="1"/>
</LinearLayout>

Step 4 : Create a new Android XML File in layout. Right-click on layout->New->Android XML File
Create a new Android XML File in layout. Right-click on layout->New->Android XML File
Give name as activity_item and click Finish.
activity_item and click Finish.
activity_item.xml
<?xml version="1.0" encoding="utf-8"?>
<RelativeLayout xmlns:android="http://schemas.android.com/apk/res/android"
    android:layout_width="match_parent"
    android:layout_height="match_parent">
    <ImageView
        android:id="@+id/photo"
        android:layout_width="55dp"
        android:layout_height="70dp"
        android:layout_margin="3dp"
        android:layout_alignParentLeft="true"
        android:scaleType="fitXY"/>
    <TextView
        android:id="@+id/name"
        android:layout_width="wrap_content"
        android:layout_height="wrap_content"
        android:layout_toRightOf="@id/photo"
        android:textStyle="bold"
        android:layout_marginTop="5dp"
        android:textSize="18sp"/>
    <TextView
        android:id="@+id/team"
        android:layout_width="wrap_content"
        android:layout_height="wrap_content"
        android:layout_toRightOf="@id/photo"
        android:layout_below="@id/name"
        android:textColor="#0000FF"
         android:layout_marginBottom="5dp"/>
</RelativeLayout>

Step 5 : The code for MainActivity.java from src->com.mia.customlistdemo is shown below.

MainActivity.java
package com.mia.customlistdemo;

import java.util.ArrayList;
import java.util.HashMap;
import android.app.ListActivity;
import android.content.Context;
import android.os.Bundle;
import android.text.Editable;
import android.text.TextWatcher;
import android.view.LayoutInflater;
import android.view.View;
import android.view.ViewGroup;
import android.widget.ArrayAdapter;
import android.widget.EditText;
import android.widget.ImageView;
import android.widget.ListView;
import android.widget.TextView;
import android.widget.Toast;

public class MainActivity extends ListActivity {
  
   //ArrayList thats going to hold the search results
   ArrayList<HashMap<String, Object>> searchResults;
  
   //ArrayList that will hold the original Data
   ArrayList<HashMap<String, Object>> originalValues;
   LayoutInflater inflater;
  
   @Override
   public void onCreate(Bundle savedInstanceState) {
  super.onCreate(savedInstanceState);
   
  setContentView(R.layout.activity_main);
  final EditText searchBox=(EditText) findViewById(R.id.searchBox);
  ListView playersListView=(ListView) findViewById(android.R.id.list);
  
  //get the LayoutInflater for inflating the customomView
  //this will be used in the custom adapter
  inflater=(LayoutInflater) getSystemService(Context.LAYOUT_INFLATER_SERVICE);
  
  //these arrays are just the data that 
  //I'll be using to populate the ArrayList
  //You can use our own methods to get the data
  String names[]={"FIESTA","XJ","BOXSTER"}; 
  
  String teams[]={"Ford","Jaguar","Porsche"};
  Integer[] photos={R.drawable.picford,R.drawable.picjaguar,R.drawable.picporsche};
  
  originalValues=new ArrayList<HashMap<String,Object>>();
  
  //temporary HashMap for populating the 
  //Items in the ListView
  HashMap<String , Object> temp;
  
  //total number of rows in the ListView
  int noOfPlayers=names.length;
  
  //now populate the ArrayList players
  for(int i=0;i<noOfPlayers;i++)
  {
   temp=new HashMap<String, Object>();
  
   temp.put("name", names[i]);
   temp.put("team", teams[i]);    
   temp.put("photo", photos[i]);
  
   //add the row to the ArrayList
   originalValues.add(temp);        
  }
  //searchResults=OriginalValues initially
  searchResults=new ArrayList<HashMap<String,Object>>(originalValues);
  
  //create the adapter
  //first param-the context
  //second param-the id of the layout file 
  //you will be using to fill a row
  //third param-the set of values that
  //will populate the ListView
  final CustomAdapter adapter=new CustomAdapter(this, R.layout.activity_item,searchResults); 
  
  //finally,set the adapter to the default ListView
  playersListView.setAdapter(adapter);
  searchBox.addTextChangedListener(new TextWatcher() {
  
  public void onTextChanged(CharSequence s, int start, int before, int count) {
    //get the text in the EditText
    String searchString=searchBox.getText().toString();
    int textLength=searchString.length();
    searchResults.clear();
  
    for(int i=0;i<originalValues.size();i++)
    {
   String playerName=originalValues.get(i).get("name").toString();
   if(textLength<=playerName.length()){
   //compare the String in EditText with Names in the ArrayList
     if(searchString.equalsIgnoreCase(playerName.substring(0,textLength)))
     searchResults.add(originalValues.get(i));
   }}
    adapter.notifyDataSetChanged();
  }
  
  public void beforeTextChanged(CharSequence s, int start, int count,
      int after) {}
    
  public void afterTextChanged(Editable s) {}
   });
  }
  
  //define your custom adapter
  private class CustomAdapter extends ArrayAdapter<HashMap<String, Object>>
  {
   public CustomAdapter(Context context, int textViewResourceId,
     ArrayList<HashMap<String, Object>> Strings) {
  
    //let android do the initializing :)
    super(context, textViewResourceId, Strings);
   }
  
   //class for caching the views in a row  
   private class ViewHolder
   {
    ImageView photo;
    TextView name,team;
   }
  
   ViewHolder viewHolder;
  
   @Override
   public View getView(int position, View convertView, ViewGroup parent) {
  
    if(convertView==null)
    {
     convertView=inflater.inflate(R.layout.activity_item, null);
     viewHolder=new ViewHolder();
  
      //cache the views
      viewHolder.photo=(ImageView) convertView.findViewById(R.id.photo);
      viewHolder.name=(TextView) convertView.findViewById(R.id.name);
      viewHolder.team=(TextView) convertView.findViewById(R.id.team);
  
       //link the cached views to the convertview
       convertView.setTag(viewHolder);
    }
    else
     viewHolder=(ViewHolder) convertView.getTag();
    int photoId=(Integer) searchResults.get(position).get("photo");
  
    //set the data to be displayed
    viewHolder.photo.setImageDrawable(getResources().getDrawable(photoId));
    viewHolder.name.setText(searchResults.get(position).get("name").toString());
    viewHolder.team.setText(searchResults.get(position).get("team").toString());
    //return the view to be displayed
    return convertView;
   }
  }
  protected void onListItemClick(ListView l, View v, int position, long id) {
   // TODO Auto-generated method stub
   super.onListItemClick(l, v, position, id);
   String str = searchResults.get(position).get("name").toString();
   try{
    if(str=="XJ"){
     Toast.makeText(getApplicationContext(), "XJ\nJAGUAR", Toast.LENGTH_SHORT).show();
    }
    if(str=="FIESTA"){
     Toast.makeText(getApplicationContext(), "FIESTA\nFORD", Toast.LENGTH_SHORT).show();
    }
    if(str=="BOXSTER"){
     Toast.makeText(getApplicationContext(), "BOXSTER\nPORSCHE", Toast.LENGTH_SHORT).show();
    }
   }
    catch(Exception e){
     e.printStackTrace();
    }
   
}
}

Step 6 : Run the Project.
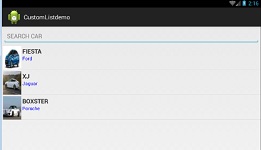
customlistview output 1
customlistview output 2

Explanation of the code :

Explanation from activity_main.xml : 
<EditText
    android:id="@+id/searchBox"
    android:layout_width="fill_parent"
    android:layout_height="wrap_content"
    android:hint="SEARCH CAR"
    android:layout_margin="5dp"
      android:padding="10dp" />
<ListView
        android:id="@android:id/list"
        android:layout_width="fill_parent"
        android:layout_height="0dp"
        android:layout_weight="1"/>

Explanation from activity_item.xml :
  • This activity is layout of a single list element. You can add other items to this activity to extra customize your list.
activity_item diagram
  • Here we have a Relative layout with a ImageView and two TextViews.
  • The name of ImageView is photo, name of list-item is name and name of list sub-item is team.
  • photo is aligned to left,
  • name is aligned to right of photo
  • team is aligned to right of photo and below name.
Explanation from MainActivity.java
  • Explanation from MainActivity.java is commented in its code.
Github download
Stay Tuned with Made In Android

Published By:
Yatin Kode
on 20.6.15

14 June 2015

Create a Google Map Application in Android

You must have created the project and obtained the API key for MAP as shown in the previous tutorial. Now we will make the application code.

What we will do ?
-> Display a Google Map in your android application.

What we need ?
  • Google API key
  • Google Play Services enabled device (Mobile phone with Android v4.2 above)
  • Import libraries (Upgraded ADT with Play Services)
Step 1 : You may have created your Android Application with name MapDemo and package name com.mia.mapdemo.
mapdemo
 Click on Next continuously Then click Finish.
activityname

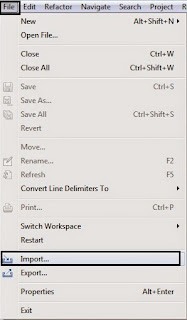
Step 2 : Import libraries in your Application. Click on File-> Import.
file import

Step 3 : Choose Android-> Existing Code into workspace. Then Click Next.
existcode

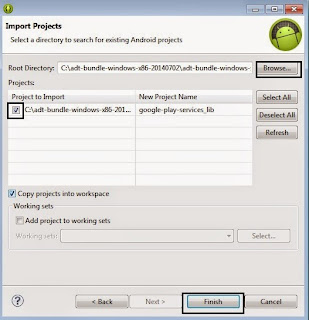
Step 4 : Click on Browse and go to location
adt-bundle-windows-x86-20140702\sdk\extras\google\google_play_services\libproject\google-play-services_lib
Your location might be different from mine, so please do not copy-paste the above link. Instead Browse it in your Computer. Tick the Project and click Finish as shown below.
playservices

Step 5 : Add fragment to activity_main.xml.

activity_main.xml
<?xml version="1.0" encoding="utf-8"?>
<LinearLayout xmlns:android="http://schemas.android.com/apk/res/android"
    android:layout_width="match_parent"
    android:layout_height="match_parent"
    android:orientation="vertical" >
    <fragment
        android:name="com.google.android.gms.maps.SupportMapFragment"
        android:id="@+id/map"
        android:layout_width="match_parent"
        android:layout_height="match_parent" />
</LinearLayout>

Step 6 : Code for MainActivity.java is shown below.

MainActivity.java
package com.mia.mapdemo;

import android.os.Bundle;
import android.support.v4.app.FragmentActivity;

public class MainActivity extends FragmentActivity  {

    @Override
    protected void onCreate(Bundle savedInstanceState) {
        super.onCreate(savedInstanceState);
        setContentView(R.layout.activity_main);
    }
}

Step 7 : Code for MapDemoManifest.xml is shown below.

MapDemoManifest.xml
<?xml version="1.0" encoding="utf-8"?>
<manifest xmlns:android="http://schemas.android.com/apk/res/android"
    package="com.mia.mapdemo"
    android:versionCode="1"
    android:versionName="1.0" >

    <uses-sdk
        android:minSdkVersion="8"
        android:targetSdkVersion="17" />

    <uses-feature
        android:glEsVersion="0x00020000"
        android:required="true"/>

    <uses-permission android:name="android.permission.INTERNET" />
    <uses-permission android:name="android.permission.ACCESS_NETWORK_STATE"/>
    <uses-permission android:name="android.permission.WRITE_EXTERNAL_STORAGE"/>
    <uses-permission android:name="com.google.android.providers.gsf.permission.READ_GSERVICES"/>
    <uses-permission android:name="android.permission.ACCESS_COARSE_LOCATION" />
    <uses-permission android:name="android.permission.ACCESS_FINE_LOCATION" />
    <application
        android:allowBackup="true"
        android:icon="@drawable/ic_launcher"
        android:label="@string/app_name"
        android:theme="@style/AppTheme" >
        <activity
            android:name="com.mia.mapdemo.MainActivity"
            android:label="@string/app_name" >
            <intent-filter>
                <action android:name="android.intent.action.MAIN" />
                <category android:name="android.intent.category.LAUNCHER" />
            </intent-filter>
        </activity>
        <meta-data
            android:name="com.google.android.maps.v2.API_KEY"
            android:value="copy_your_api_key_here" />
        <meta-data android:name="com.google.android.gms.version"
             android:value="@integer/google_play_services_version" />
    </application>

</manifest>

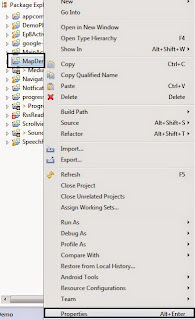
Step 8 : Right-click on MapDemo in Project Explorer and click on Properties.
properties

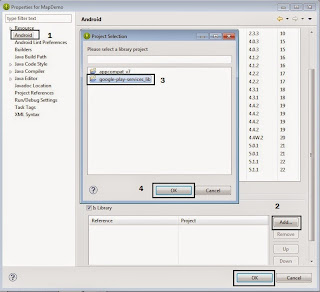
Step 9 : Click on Android in left-panel, then click on Add and choose Google-play-services, then click OK.
playserviceslib
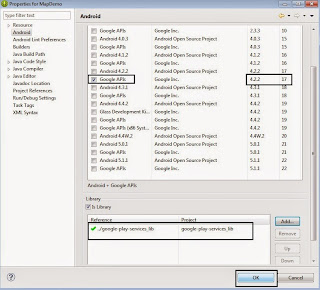
.You will see Google-play-services in the box as shown below, Also tick on Google API (4.2.2/17) then click OK.
googleapi17

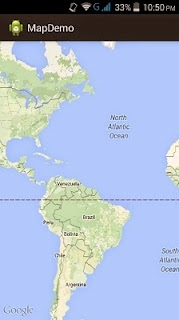
Step 10 : Run your Application in device with Google Play Services.
mapop

Explanation of the code :

Explanation from activity_main.xml :

Explanation from MainActivity.java :
  • Here we just import the class library FragmentActivity and extend it to MainActivity. You can extend your code further to make manipulations in the Map.
import android.support.v4.app.FragmentActivity;
public class MainActivity extends FragmentActivity  {

Explanation from MapDemoManifest.xml :
  • We include all the permissions required like INTERNET, ACCESS_COARSE_LOCATION etc. to get internet connection,location in the map etc.
 <uses-permission android:name="android.permission.INTERNET" />
    <uses-permission android:name="android.permission.ACCESS_NETWORK_STATE"/>
    <uses-permission android:name="android.permission.WRITE_EXTERNAL_STORAGE"/>
    <uses-permission android:name="com.google.android.providers.gsf.permission.READ_GSERVICES"/>
    <uses-permission android:name="android.permission.ACCESS_COARSE_LOCATION" />
    <uses-permission android:name="android.permission.ACCESS_FINE_LOCATION" />
  • In meta-data you get the API KEY and connect with google-play-developer-console, which permits us to use Maps in our application.
<meta-data
            android:name="com.google.android.maps.v2.API_KEY"
            android:value="copy_your_api_key_here" />
download
Stay Tuned with Made In Android

Published By:
Yatin Kode
on 14.6.15

11 June 2015

Create Map API key for including map in android app

What you need?
Step 1 : Open Eclipse ADT and create a new Application. Go to File->New->Android Application Project.
file new android app

Step 2 : Give name to your application (MapDemo) and a package name(com.mia.mapdemo). Remember the package name, it will be needed further. Click Next
mapdemo

Step 3 : Go on clicking Next then click Finish.
activity main mainactivity

Step 4 : Go to Window->Preferences.
window preferences

Step 5 : Go to Android->Build and Remember the SHA1 fingerprint. It will be required further. It is unique for each user. Then click OK.
android build

Step 6 : Go to Google Developer Console . Then click Create Project. Give name to Project same the app name created in eclipse, then click Create.
developer console

Step 7 : Go to APIs under API & Auth on left panel. Then go to Google Maps Android API as shown below.
map android api

Step 8 : Then click Enable API.
enable api
The API will be enabled as shown below.
enabled api

Step 9 : Go to Credentials under API and Auth on left panel. Click on Create New Key, inside the dialog box click on Android key.
android key

Step 10 : Copy the SHAI fingerprint from Step 5 followed by semi-colon(;) followed by package name(com.mia.mapdemo) from Step 2 in the TextBox. Then click Create.
sha1;package name

Step 11 : You will get the MAP API key as shown below which will also be unique for a developer.
map api key
Stay Tuned with Made In Android

Published By:
Yatin Kode
on 11.6.15

8 June 2015

Make your own Speech Recognition without Google popup

What we will do ?
-> We will prepare Speech Recognition application for Android API 17 and above without calling the default Google Speech Recognizer.

What we will need ?
  • Eclipse with ADT
  • Android Smartphone with Android version 4.0 OR above.
Step 1 : Create a New Application. Go to File->New->Android Application Project.
File New Android Application Project

Step 2 : Give a Name to your Application as SpeechRecogDemo and package name as com.mia.speechrecogdemo
Name to your Application as SpeechRecogDemo and package name as com.mia.speechrecogdemo
Click Next continuously and at last click Finish.

Step 3 : Open strings.xml from res->values
strings.xml
<?xml version="1.0" encoding="utf-8"?>
<resources>
    <string name="app_name">SpeechRecogdemo</string>
    <string name="hello_world">Welcome</string>
    <string name="menu_settings">Settings</string>
</resources>

Step 4 : Open activity_main.xml from res->layout.
activity-main.xml
<RelativeLayout xmlns:android="http://schemas.android.com/apk/res/android"
    xmlns:tools="http://schemas.android.com/tools"
    android:layout_width="match_parent"
    android:layout_height="match_parent" >
    <TextView
        android:id="@+id/responseText"
        android:layout_width="fill_parent"
        android:layout_height="wrap_content"
        android:layout_alignParentLeft="true"
        android:layout_alignParentTop="true"
        android:text="@string/hello_world"
        android:textSize="35dp" />
</RelativeLayout>

Step 5 : Download package org.apache.commons.lang3 from here. Unzip the zip file and check in the folder for file commons-lang3-3.4.jar

Step 6 : Right-click on SpeechRecogDemo from Project Explorer and select Build Path->Configure Build Path.
Right-click on SpeechRecogDemo from Project Explorer and select Build Path->Configure Build Path

Step 7 :  Click on Add External JARs.
Click on Add External JARs.
Browse to location where you have downloaded org.apache.commons.lang3 and select commons-lang3-3.4.jar.
Add it and press OK.
press OK.

Step 8 : Open MainActivity.java from src->com.mia.speechrecogdemo.
MainActivity.java
package com.mia.speechrecogdemo;

import java.text.SimpleDateFormat;
import java.util.ArrayList;
import java.util.Calendar;

import org.apache.commons.lang3.StringUtils;

import android.annotation.SuppressLint;
import android.app.Activity;
import android.content.Context;
import android.content.Intent;
import android.net.Uri;
import android.os.Bundle;
import android.os.Handler;
import android.os.PowerManager;
import android.speech.RecognitionListener;
import android.speech.RecognizerIntent;
import android.speech.SpeechRecognizer;
import android.util.Log;
import android.view.Menu;
import android.view.View;
import android.widget.TextView;

@SuppressLint("SimpleDateFormat")
public class MainActivity extends Activity {

 private static final String TAG = MainActivity.class.getName();

 //wakelock to keep screen on
 protected PowerManager.WakeLock mWakeLock;

 //speach recognizer for callbacks
 private SpeechRecognizer mSpeechRecognizer;

 //handler to post changes to progress bar
 private Handler mHandler = new Handler();

 //ui textview
 TextView responseText;

 //intent for speech recogniztion
 Intent mSpeechIntent;
 
 //this bool will record that it's time to kill P.A.L.
 boolean killCommanded = false;

 //legel commands
 private static final String[] VALID_COMMANDS = {
  "Best Website for Android",
  "what day is it",
  "who are you",
  "exit"
 };
 private static final int VALID_COMMANDS_SIZE = VALID_COMMANDS.length;


 @Override
 public void onCreate(Bundle savedInstanceState) {
  super.onCreate(savedInstanceState);
  setContentView(R.layout.activity_main);
  responseText = (TextView) findViewById(R.id.responseText);
 }

 @Override
 protected void onStart() {
  mSpeechRecognizer = SpeechRecognizer.createSpeechRecognizer(MainActivity.this);
  SpeechListener mRecognitionListener = new SpeechListener();
  mSpeechRecognizer.setRecognitionListener(mRecognitionListener);
  mSpeechIntent = new Intent(RecognizerIntent.ACTION_RECOGNIZE_SPEECH);

  mSpeechIntent.putExtra(RecognizerIntent.EXTRA_CALLING_PACKAGE,"com.androiddev101.ep8");

  // Given an hint to the recognizer about what the user is going to say
  mSpeechIntent.putExtra(RecognizerIntent.EXTRA_LANGUAGE_MODEL,
    RecognizerIntent.LANGUAGE_MODEL_FREE_FORM);

  // Specify how many results you want to receive. The results will be sorted
  // where the first result is the one with higher confidence.
  mSpeechIntent.putExtra(RecognizerIntent.EXTRA_MAX_RESULTS, 20);


  mSpeechIntent.putExtra(RecognizerIntent.EXTRA_PARTIAL_RESULTS, true);

  //aqcuire the wakelock to keep the screen on until user exits/closes app
  final PowerManager pm = (PowerManager) getSystemService(Context.POWER_SERVICE);
  this.mWakeLock = pm.newWakeLock(PowerManager.SCREEN_DIM_WAKE_LOCK, TAG);
  this.mWakeLock.acquire();
  mSpeechRecognizer.startListening(mSpeechIntent);
  super.onStart();
 }
 @Override
 public boolean onCreateOptionsMenu(Menu menu) {
  return false;
 }
 private String getResponse(int command){
  Calendar c = Calendar.getInstance();

  String retString =  "I'm sorry, Not Possible for me";
  SimpleDateFormat dfDate_day;
  switch (command) {
  case 0:
   retString = "MADEINANDROID.NET";
     responseText.setOnClickListener(new View.OnClickListener() {                   
                     @Override
                     public void onClick(View arg0) {
                         // TODO Auto-generated method stub
                         Intent i = new Intent(android.content.Intent.ACTION_VIEW, Uri.parse("http://madeinandroid.net/"));
                         startActivity(i);           
                     }
                 });
   break;
  case 1:
   dfDate_day = new SimpleDateFormat("dd/MM/yyyy");
   retString= " Today is " + dfDate_day.format(c.getTime());
   break;
  case 2:
   retString = "Answering Machine";
   break;

  case 3:
   killCommanded = true;
   break;

  default:
   break;
  }
  return retString;
 }

 @Override
 protected void onPause() {
  //kill the voice recognizer
  if(mSpeechRecognizer != null){
   mSpeechRecognizer.destroy();
   mSpeechRecognizer = null;

  }
  this.mWakeLock.release();
  super.onPause();
 }

 private void processCommand(ArrayList<String> matchStrings){
  String response = "I'm sorry, Dave. I'm afraid I can't do that.";
  int maxStrings = matchStrings.size();
  boolean resultFound = false;
  for(int i =0; i < VALID_COMMANDS_SIZE && !resultFound;i++){
   for(int j=0; j < maxStrings && !resultFound; j++){
    if(StringUtils.getLevenshteinDistance(matchStrings.get(j), VALID_COMMANDS[i]) (VALID_COMMANDS[i].length() / 3) ){
     response = getResponse(i);
    }
   }
  }
  
  final String finalResponse = response;
  mHandler.post(new Runnable() {
   public void run() {
    responseText.setText(finalResponse);
   }
  });

 }
 class SpeechListener implements RecognitionListener {
  public void onBufferReceived(byte[] buffer) {
   Log.d(TAG, "buffer recieved ");
  }
  public void onError(int error) {
   //if critical error then exit
   if(error == SpeechRecognizer.ERROR_CLIENT || error == SpeechRecognizer.ERROR_INSUFFICIENT_PERMISSIONS){
    Log.d(TAG, "client error");
   }
   //else ask to repeats
   else{
    Log.d(TAG, "other error");
    mSpeechRecognizer.startListening(mSpeechIntent);
   }
  }
  public void onEvent(int eventType, Bundle params) {
   Log.d(TAG, "onEvent");
  }
  public void onPartialResults(Bundle partialResults) {
   Log.d(TAG, "partial results");
  }
  public void onReadyForSpeech(Bundle params) {
   Log.d(TAG, "on ready for speech");
  }
  public void onResults(Bundle results) {
   Log.d(TAG, "on results");
   ArrayList<String> matches = null;
   if(results != null){
    matches = results.getStringArrayList(SpeechRecognizer.RESULTS_RECOGNITION);
    if(matches != null){
     Log.d(TAG, "results are " + matches.toString());
     final ArrayList<String> matchesStrings = matches;
     processCommand(matchesStrings);
     if(!killCommanded)
      mSpeechRecognizer.startListening(mSpeechIntent);
     else
      finish();

    }
   }

  }
  public void onRmsChanged(float rmsdB) {
   //   Log.d(TAG, "rms changed");
  }
  public void onBeginningOfSpeech() {
   Log.d(TAG, "speach begining");
  }
  public void onEndOfSpeech() {
   Log.d(TAG, "speach done");
  }

 };

}

Step 9 : Run the application in your Android Phone.Watch the video below to see the output.
Github download
Stay Tuned with Made In Android

Published By:
Yatin Kode
on 8.6.15

1 June 2015

Make Navigation Drawer in Android

What we will do ?
-> We will prepare a navigation drawer with a list. The list activity will display a toast on the other fragment.

What we need ?
  • Emulator with Android 4 and above
  • v5 Updated SDK.
Step 1 : Make a new Android application. Click on File->New->Android Application Project.
Step 1 : Make a new Android application. Click on File New Android Application Project.
Step 2 : Give a name to your Application as NavigateDemo and package name as com.mia.navigatedemo
Application as NavigateDemo and package name as com.mia.navigatedemo
Then click Next continuously and at last click Finish.

Step 3 : Click on File->Import.
File->Import.

Step 4 : Then choose Android->Existing Android Code into Workspace
Android->Existing Android Code into Workspace

Step 5 : Click on Browse and go to the location shown below in adt folder.
adt-bundle-windows-x86-20140702\sdk\extras\android\support\v7\appcompat
Note - This location may vary from machine to machine.
adt-bundle-windows-x86-20140702\sdk\extras\android\support\v7\appcompat

Step 6 : Right click on NavigateDemo from Project Explorer and select Properties.
right click properties
 Select Android from left side. Click on Add and add appcombat_v7 as shown below.
Add and add appcombat_v7

Step 7 : Open activity_main.xml from res->layout folder in NavigateDemo. Copy the code below in it.

activity_main.xml
<android.support.v4.widget.DrawerLayout xmlns:android="http://schemas.android.com/apk/res/android"
    android:id="@+id/drawer_layout"
    android:layout_width="match_parent"
    android:layout_height="match_parent">
     <!-- The main content view -->
    <FrameLayout
        android:id="@+id/content_frame"
        android:layout_width="match_parent"
        android:layout_height="match_parent" />
 
    <!-- The navigation drawer -->
    <ListView android:id="@+id/left_drawer"
        android:layout_width="240dp"
        android:layout_height="match_parent"
        android:layout_gravity="start"<
        android:choiceMode="singleChoice"        
        android:divider="#666"
        android:dividerHeight="1dp"
        android:background="#333"        
        android:paddingLeft="15sp"
        android:paddingRight="15sp"
        />
</android.support.v4.widget.DrawerLayout>

Step 8 : Create a new xml file under layout and name it as drawer_listview_item.xml

drawer_listview_item.xml
<?xml version="1.0" encoding="utf-8"?>

<TextView xmlns:android="http://schemas.android.com/apk/res/android"
    android:id="@android:id/text1"
    android:layout_width="match_parent"
    android:layout_height="wrap_content"
    android:textColor="#fff"
    android:textSize="20sp"
    android:gravity="center_vertical"
    android:paddingStart="14.5sp"
    android:paddingEnd="14.5sp"
    android:minHeight="35sp"
/>
Step 9 : Under strings.xml from res->values add the code shown below.

strings.xml
<?xml version="1.0" encoding="utf-8"?>
<resources>
    <string name="app_name">App</string>
    <string name="action_settings">Settings</string>
    <string name="hello_world">Hello world!</string>
    <string-array name="items">
        <item>Item 1</item>
        <item>Item 2</item>
        <item>Item 3</item>
        <item>Item 4</item>
        <item>Item 5</item>
        <item>Item 6</item>
    </string-array>
    <string name="drawer_open">Open navigation drawer</string>
    <string name="drawer_close">Close navigation drawer</string>
</resources>

Step 10 : Open MainActivity.java from src->com.mia.navigatedemo and add the code below.

MainActivity.java
package com.mia.navigatedemo;
import android.os.Bundle;
import android.app.Activity;
import android.content.res.Configuration;
import android.support.v4.app.ActionBarDrawerToggle;
import android.support.v4.view.GravityCompat;
import android.support.v4.widget.DrawerLayout;
import android.view.Menu;
import android.view.MenuItem;
import android.view.View;
import android.widget.AdapterView;
import android.widget.ArrayAdapter;
import android.widget.ListView;
import android.widget.TextView;
import android.widget.Toast;

public class MainActivity extends Activity {

    private String[] drawerListViewItems;
    private DrawerLayout drawerLayout;
    private ListView drawerListView;
    private ActionBarDrawerToggle actionBarDrawerToggle;

    @Override
    protected void onCreate(Bundle savedInstanceState) {
        super.onCreate(savedInstanceState);
        setContentView(R.layout.activity_main);

        // get list items from strings.xml
        drawerListViewItems = getResources().getStringArray(R.array.items);
        // get ListView defined in activity_main.xml
        drawerListView = (ListView) findViewById(R.id.left_drawer);

        // Set the adapter for the list view
        drawerListView.setAdapter(new ArrayAdapter<String>(this,
                R.layout.drawer_listview_item, drawerListViewItems));

        // App Icon
        drawerLayout = (DrawerLayout) findViewById(R.id.drawer_layout);

        // create ActionBarDrawerToggle
        actionBarDrawerToggle = new ActionBarDrawerToggle(
                this,                  /* host Activity */
                drawerLayout,         /* DrawerLayout object */
                R.drawable.ic_drawer,  /* nav drawer icon to replace 'Up' caret */
                R.string.drawer_open,  /* "open drawer" description */
                R.string.drawer_close  /* "close drawer" description */
                );

        //Set actionBarDrawerToggle as the DrawerListener
        drawerLayout.setDrawerListener(actionBarDrawerToggle);

        //enable and show "up" arrow
        getActionBar().setDisplayHomeAsUpEnabled(true);

        // just styling option
        drawerLayout.setDrawerShadow(R.drawable.drawer_shadow, GravityCompat.START);
        drawerListView.setOnItemClickListener(new DrawerItemClickListener());
    }

    @Override
    protected void onPostCreate(Bundle savedInstanceState) {
        super.onPostCreate(savedInstanceState);
        // Sync the toggle state after onRestoreInstanceState has occurred.
         actionBarDrawerToggle.syncState();
    }

    @Override
    public void onConfigurationChanged(Configuration newConfig) {
        super.onConfigurationChanged(newConfig);
        actionBarDrawerToggle.onConfigurationChanged(newConfig);
    }

    @Override
    public boolean onOptionsItemSelected(MenuItem item) {
         // call ActionBarDrawerToggle.onOptionsItemSelected(), if it returns true
        // then it has handled the app icon touch event
        if (actionBarDrawerToggle.onOptionsItemSelected(item)) {
            return true;
        }
        return super.onOptionsItemSelected(item);
    }

    private class DrawerItemClickListener implements ListView.OnItemClickListener {
        @Override
        public void onItemClick(AdapterView parent, View view, int position, long id) {
            Toast.makeText(MainActivity.this, ((TextView)view).getText(), Toast.LENGTH_LONG).show();
            drawerLayout.closeDrawer(drawerListView);
        }
    }
}

Step 11 : Change the minSdkVersion in NavigateDemoManifest.xml
<uses-sdk
        android:minSdkVersion="11"
        android:targetSdkVersion="21" />
Step 12 : Run the Application. Choose emulator of version 4 or above
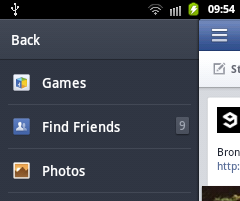
navigation output

Explanation of the code :

Explanation from activity_main.xml:
Explanation from drawer_listview_item.xml : 
  • This is to define element of a list. We have considered a TextView here. You can experiment to add an icon before it, also a sub-item for the list.
Explanation from MainActivty.java:
  • The explanation of the code is mentioned in the comments.
Stay Tuned with Made In Android

Published By:
Yatin Kode
on 1.6.15

Previous Page Next Page Home
Top