Quite a simple thing to set up the adt .
Step 1 : Download adt from here:
You have a compressed file of adt in your Downloads folder.
Step 10 : Choose the icon for your app from your disk by clicking on Browse or let it be as it is and click Next .
Step 1 : Download adt from here:
| Operating System | Link |
|---|---|
| Windows (32 bit) | https://dl.google.com/android/adt/adt-bundle-windows-x86-20140702.zip |
| Windows (64bit) | https://dl.google.com/android/adt/adt-bundle-windows-x86_64-20140702.zip |
| Mac (64 bit) | dl.google.com/android/adt/adt-bundle-mac-x86_64-20140702.zip |
| Linux (32 bit) | dl.google.com/android/adt/adt-bundle-linux-x86-20140702.zip |
| Linux (64 bit) | dl.google.com/android/adt/adt-bundle-linux-x86_64-20140702.zip |
Step 2 : Extract the file with Winrar or any other extracting software .Save the Extracted file in the disk of your choice
I have saved it in C:/ disk (Windows) .
Step 3 : Open the adt folder. Open SDK Manager.exe and install al the packages.
See I have installed all the packages which go up to 34 GB which is the latest update. You can skip unwanted packages.
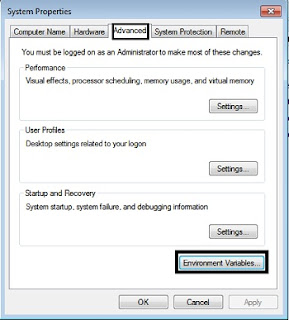
Step 4 : Right click on My Computer->Properties. Click on Advanced system settings in the left panel. Click on Environmental Variables..
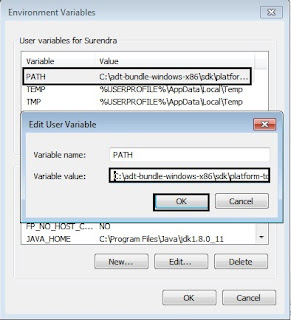
Select PATH under Environment Variables and add path of platform tools,tools from sdk in adt and bin in jdk folder.
NOTE: Each single path is followed by ;
My path is shown below.
C:\adt-bundle-windows-x86\sdk\platform-tools\;C:\adt-bundle-windows-x86\sdk\tools\;C:\Program Files\Java\jdk1.8.0_11\bin;
Select New from System Variables. Give name as JAVA_HOME and path as that of jdk (C:\Program Files\Java\jdk1.8.0_11).Press OK.
Step 5 : Select eclipse.exe from the eclipse folder
Step 6 : Select the workspace in which you want to save your project. (anomaly : package in java)and press O.K.
Step 7 : After the Eclipse has loaded just cancel the Welcome page and Select New -> Android Application Project.
Step 8 : Give a name to your Project ( MyFirstProject ) and just click Next .
Step 9 : See that there are three ticks like those in the image below and click Next .
Step 10 : Choose the icon for your app from your disk by clicking on Browse or let it be as it is and click Next .
Step 11 : Choose BlankActivity and click Next .
Step 12 : Choose the name of java class and name of the XML file and click Finish .
Link to Part - 2
Stay Tuned with Made In Android


No comments:
Post a Comment