As you installed the Android Studio and started making your first app, you may have realized that the emulator won't start. This is because of lack of some libraries or drivers.
The solution to this problem is.
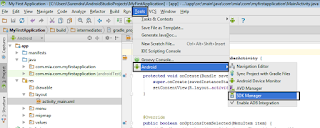
Step 1 : Open the Android SDK manager. Click on Tools->Android->SDK Manager from the menu bar.
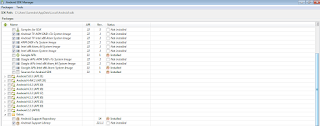
Step 2 : Select the packages as shown in the image below. All the packages are not shown in the image below.
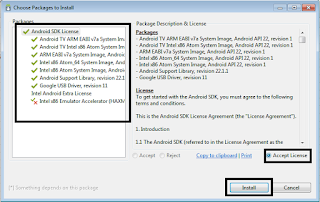
The packages to be chosen are:
Step 4 : Run the project.
Choose the device and click Box besides Device. Do not click OK.
Step 5 : Choose Nexus5 API OR Nexus One and click Edit (pencil shaped icon).
Step 6 : Give a name to your emulator. Go to Advanced Settings.
Step 7 : Choose Appropriate RAM and Internal Memory,External Memory,and check on Keyboard Input. Then click Finish.
Now run the application with your newly defined emulator.
The solution to this problem is.
Step 1 : Open the Android SDK manager. Click on Tools->Android->SDK Manager from the menu bar.
Step 2 : Select the packages as shown in the image below. All the packages are not shown in the image below.
The packages to be chosen are:
- Android TV ARM EABI v7a System Image (Important)
- Android TV Intel x86 Atom System Image (Important)
- ARM EABI v7a System Image (Important)
- Intel x86 Atom_64 System Image (Important)
- Intel x86 Atom System Image (Important)
- Android Support Library (Important)
- Intel x86 Emulator Accelerator HAXM (Important)
- Google USB Driver Revision 11 (Optional)
Step 4 : Run the project.
Choose the device and click Box besides Device. Do not click OK.
Step 5 : Choose Nexus5 API OR Nexus One and click Edit (pencil shaped icon).
Step 6 : Give a name to your emulator. Go to Advanced Settings.
Step 7 : Choose Appropriate RAM and Internal Memory,External Memory,and check on Keyboard Input. Then click Finish.
Now run the application with your newly defined emulator.
Stay Tuned with Made In Android


No comments:
Post a Comment