What we will do ?
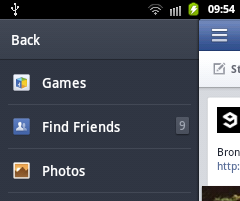
-> We will prepare a navigation drawer with a list. The list activity will display a toast on the other fragment.
What we need ?
- Emulator with Android 4 and above
- v5 Updated SDK.
Step 1 : Make a new Android application. Click on File->New->Android Application Project.
Step 2 : Give a name to your Application as NavigateDemo and package name as com.mia.navigatedemo
Then click Next continuously and at last click Finish.
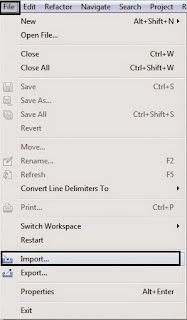
Step 3 : Click on File->Import.
Step 4 : Then choose Android->Existing Android Code into Workspace
Step 5 : Click on Browse and go to the location shown below in adt folder.
adt-bundle-windows-x86-20140702\sdk\extras\android\support\v7\appcompat
Note - This location may vary from machine to machine.
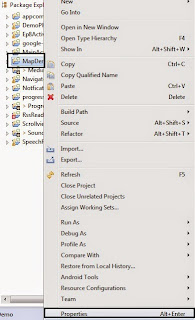
Step 6 : Right click on NavigateDemo from Project Explorer and select Properties.
Select Android from left side. Click on Add and add appcombat_v7 as shown below.
Step 7 : Open activity_main.xml from res->layout folder in NavigateDemo. Copy the code below in it.
activity_main.xml
<android.support.v4.widget.DrawerLayout xmlns:android="http://schemas.android.com/apk/res/android"
    android:id="@+id/drawer_layout"
    android:layout_width="match_parent"
    android:layout_height="match_parent">
     <!-- The main content view -->
    <FrameLayout
        android:id="@+id/content_frame"
        android:layout_width="match_parent"
        android:layout_height="match_parent" />

    <!-- The navigation drawer -->
    <ListView android:id="@+id/left_drawer"
        android:layout_width="240dp"
        android:layout_height="match_parent"
        android:layout_gravity="start"<
        android:choiceMode="singleChoice"
        android:divider="#666"
        android:dividerHeight="1dp"
        android:background="#333"
        android:paddingLeft="15sp"
        android:paddingRight="15sp"
        />
</android.support.v4.widget.DrawerLayout>
Step 8 : Create a new xml file under layout and name it as drawer_listview_item.xml
drawer_listview_item.xml
strings.xml
<?xml version="1.0" encoding="utf-8"?>

<TextView xmlns:android="http://schemas.android.com/apk/res/android"
    android:id="@android:id/text1"
    android:layout_width="match_parent"
    android:layout_height="wrap_content"
    android:textColor="#fff"
    android:textSize="20sp"
    android:gravity="center_vertical"
    android:paddingStart="14.5sp"
    android:paddingEnd="14.5sp"
    android:minHeight="35sp"
/>
Step 9 : Under strings.xml from res->values add the code shown below.
<?xml version="1.0" encoding="utf-8"?>
<resources>
    <string name="app_name">App</string>
    <string name="action_settings">Settings</string>
    <string name="hello_world">Hello world!</string>
    <string-array name="items">
        <item>Item 1</item>
        <item>Item 2</item>
        <item>Item 3</item>
        <item>Item 4</item>
        <item>Item 5</item>
        <item>Item 6</item>
    </string-array>
    <string name="drawer_open">Open navigation drawer</string>
    <string name="drawer_close">Close navigation drawer</string>
</resources>
Step 10 : Open MainActivity.java from src->com.mia.navigatedemo and add the code below.
MainActivity.java
package com.mia.navigatedemo;
import android.os.Bundle;
import android.app.Activity;
import android.content.res.Configuration;
import android.support.v4.app.ActionBarDrawerToggle;
import android.support.v4.view.GravityCompat;
import android.support.v4.widget.DrawerLayout;
import android.view.Menu;
import android.view.MenuItem;
import android.view.View;
import android.widget.AdapterView;
import android.widget.ArrayAdapter;
import android.widget.ListView;
import android.widget.TextView;
import android.widget.Toast;

public class MainActivity extends Activity {

    private String[] drawerListViewItems;
    private DrawerLayout drawerLayout;
    private ListView drawerListView;
    private ActionBarDrawerToggle actionBarDrawerToggle;

    @Override
    protected void onCreate(Bundle savedInstanceState) {
        super.onCreate(savedInstanceState);
        setContentView(R.layout.activity_main);

        // get list items from strings.xml
        drawerListViewItems = getResources().getStringArray(R.array.items);
        // get ListView defined in activity_main.xml
        drawerListView = (ListView) findViewById(R.id.left_drawer);

        // Set the adapter for the list view
        drawerListView.setAdapter(new ArrayAdapter<String>(this,
                R.layout.drawer_listview_item, drawerListViewItems));

        // App Icon
        drawerLayout = (DrawerLayout) findViewById(R.id.drawer_layout);

        // create ActionBarDrawerToggle
        actionBarDrawerToggle = new ActionBarDrawerToggle(
                this,                  /* host Activity */
                drawerLayout,         /* DrawerLayout object */
                R.drawable.ic_drawer,  /* nav drawer icon to replace 'Up' caret */
                R.string.drawer_open,  /* "open drawer" description */
                R.string.drawer_close  /* "close drawer" description */
                );

        //Set actionBarDrawerToggle as the DrawerListener
        drawerLayout.setDrawerListener(actionBarDrawerToggle);

        //enable and show "up" arrow
        getActionBar().setDisplayHomeAsUpEnabled(true);

        // just styling option
        drawerLayout.setDrawerShadow(R.drawable.drawer_shadow, GravityCompat.START);
        drawerListView.setOnItemClickListener(new DrawerItemClickListener());
    }

    @Override
    protected void onPostCreate(Bundle savedInstanceState) {
        super.onPostCreate(savedInstanceState);
        // Sync the toggle state after onRestoreInstanceState has occurred.
         actionBarDrawerToggle.syncState();
    }

    @Override
    public void onConfigurationChanged(Configuration newConfig) {
        super.onConfigurationChanged(newConfig);
        actionBarDrawerToggle.onConfigurationChanged(newConfig);
    }

    @Override
    public boolean onOptionsItemSelected(MenuItem item) {
         // call ActionBarDrawerToggle.onOptionsItemSelected(), if it returns true
        // then it has handled the app icon touch event
        if (actionBarDrawerToggle.onOptionsItemSelected(item)) {
            return true;
        }
        return super.onOptionsItemSelected(item);
    }

    private class DrawerItemClickListener implements ListView.OnItemClickListener {
        @Override
        public void onItemClick(AdapterView parent, View view, int position, long id) {
            Toast.makeText(MainActivity.this, ((TextView)view).getText(), Toast.LENGTH_LONG).show();
            drawerLayout.closeDrawer(drawerListView);
        }
    }
}
Step 11 : Change the minSdkVersion in NavigateDemoManifest.xml
<uses-sdk
        android:minSdkVersion="11"
        android:targetSdkVersion="21" />
Step 12 : Run the Application. Choose emulator of version 4 or above
Explanation of the code :
Explanation from activity_main.xml:
- We have defined a FrameLayout and a ListView inside Drawer layout. The FrameLayout is from the right side and listview for left side.
- This is to define element of a list. We have considered a TextView here. You can experiment to add an icon before it, also a sub-item for the list.
- The explanation of the code is mentioned in the comments.
Stay Tuned with Made In Android


No comments:
Post a Comment